

You assess the pattern, protect the surface, and preserve the history before touching a Victorian Minton tile pathway. Start by documenting its layout, condition, and previous repairs, then gather gentle, compatible materials rather than relying on modern shortcuts. With pH-neutral cleaning, careful lifting, lime-based bedding, and precise relaying, you can restore stability without erasing character—but one hidden failure beneath the tiles may determine whether your repair endures.
Key Takeaways
- Inspect, photograph, and map every tile, defect, pattern, joint, and level change before disturbing the pathway.
- Clean gently with a soft brush, minimal moisture, and pH-neutral soap; avoid acids, bleach, abrasives, and flooded joints.
- Lift loose tiles carefully, label their positions, remove failed bedding, and investigate dampness, hollows, cracking, or settlement beneath.
- Repair cracks with compatible conservation materials and replace missing tiles using accurately matched Victorian patterns, colors, sizes, and maker’s marks.
- Relay tiles on a stable, cured, compatible bed, align patterns and levels, repoint joints, and protect the surface while curing.
Check the Victorian Minton Pathway First

Before cleaning or lifting anything, inspect the Victorian Minton pathway in place and record its condition. Walk its full length, noting loose tiles, cracks, losses, staining, dampness, and areas where the surface has settled.
Photograph each section from consistent angles, then create a simple plan marking every defect and tile position.
Look closely at Victorian patterns, borders, maker’s details, and colour relationships; these features can reveal the original arrangement and guide accurate reinstatement.
Assess whether damage results from impact, moisture, movement, or previous repairs, without disturbing fragile surfaces.
Record mortar joints, edge restraints, adjacent paving, and changes in level.
Your documentation preserves historical significance and establishes evidence for later decisions.
If tiles appear unstable or sounds indicate hollowness, mark those locations clearly and leave them undisturbed until assessment is complete.
Gather Tools for Cleaning and Relaying
Gather pH-neutral cleaning supplies, soft brushes, and absorbent cloths to protect the Minton tiles’ historic surface. You’ll also need compatible repair materials, including lime-based mortar and carefully matched replacement tiles.
Prepare relaying equipment—levels, straightedges, spacers, and lifting tools—so you can reset each tile accurately without unnecessary disturbance.
Cleaning Supplies
For a Victorian Minton tile pathway, assemble soft natural-bristle brushes, pH-neutral cleaner, distilled water, cotton swabs, wooden picks, nitrile gloves, absorbent towels, and a low-suction vacuum with a brush attachment. Choose tools that won’t scratch glaze, disturb historic pigments, or drive grit into porous joints.
Use graduated brush sizes for gentle cleaning techniques: reserve the smallest brushes for recessed ornament and edges. Keep distilled water separate for controlled rinsing, and change towels frequently so dissolved soil isn’t redistributed.
Cotton swabs support careful testing in inconspicuous areas, while wooden picks lift lodged debris without metal contact. For stain removal, avoid bleach, acids, abrasive powders, and household detergents; they can etch surfaces or alter Victorian finishes.
Work with ventilation, document each test, and stop if color, gloss, or friable material changes.
Repair Materials
Once cleaning tests confirm the tile and grout can tolerate handling, assemble repair materials that support reversible, low-impact work.
Keep acid-free tissue, cotton cloths, and small polyethylene bags ready to wrap and label lifted tiles.
Choose a compatible lime-based mortar or conservation-grade tile adhesive only after identifying the original bedding; avoid hard cement, which can trap moisture and stress historic clay.
Prepare fine, washed sand, hydrated lime, and clean water for carefully matched grout, testing color and texture against an inconspicuous joint.
Gather stainless-steel or plastic scrapers, wooden picks, soft brushes, and a small spray bottle for controlled cleaning and dampening.
Record each tile’s position, orientation, and pattern before removal, preserving Victorian patterns and protecting tile durability.
Use gloves, eye protection, and dust control throughout.
Relaying Equipment
With the layout documented and repair materials selected, set out the tools that will let you clean and relay the pathway without damaging its historic fabric. Gather soft brushes, wooden scrapers, cotton swabs, and a low-pressure vacuum for careful cleaning.
Use a rubber mallet, narrow pointing trowels, a small spirit level, straightedge, and spacer gauges to position tiles accurately without bruising their edges. Keep buckets, measured containers, and clean sponges ready for controlled mortar work, plus a damp cloth for immediate residue removal.
Choose plastic sheeting and padded trays to protect adjacent surfaces and store lifted tiles safely. Your Victorian design demands patient handling; its historical context makes every original glaze, alignment, and joint significant.
Avoid metal picks, abrasive pads, and power tools, which can erase evidence and surface detail.
Clean Minton Tiles Without Causing Damage
Before you clean a Victorian Minton tile pathway, identify its glaze, surface wear, and historic deposits, since aggressive treatment can remove original colour or soften the tile’s sharp relief.
Begin by vacuuming loose grit with a soft brush attachment, then test distilled water in an inconspicuous area. If the glaze remains stable, use a barely damp, lint-free cloth and pH-neutral soap, working in small sections.
Don’t flood joints or leave moisture standing; porous bedding can retain water and encourage salts. Lift stubborn grime with wooden tools, never metal blades, abrasive pads, bleach, or acidic cleaners.
Rinse sparingly with clean water and dry immediately using absorbent towels. Photograph each stage to support historical accuracy and document your Minton tile preservation decisions.
Stop if colour transfers, powdering appears, or deposits resist gentle cleaning.
Repair Cracked Tiles and Replace Missing Ones

Begin by evaluating each crack, checking whether it affects the tile’s surface, body, or surrounding bedding. You’ll need to distinguish repairable damage from tiles that require careful removal and replacement.
Match new Minton tiles by pattern, colour, size, and wear, then set them level without disturbing the historic pathway.
Assess Cracks and Damage
Once the pathway is clean and dry, assess every Minton tile for hairline cracks, edge loss, movement, and missing sections, recording each defect on a sketch or photograph.
Examine cracks under angled light, noting whether they remain superficial or traverse the tile body.
Test loose edges gently, never levering against neighbouring tiles, and mark hollow-sounding or rocking pieces for careful lifting later.
Check joints for widening, powdering, or cement repairs that conceal original damage.
Photograph each area in context so you preserve the mosaic pattern and establish historical accuracy before intervention.
Distinguish tile failure from movement in the bedding or sub-base; recurring fractures may indicate structural instability rather than isolated defects.
Don’t discard fragments: label and store them safely, since they may clarify the tile’s original profile and extent of loss.
Match and Set Replacements
With the damage mapped, match replacement tiles to the originals in clay body, dimensions, glaze, colour, and wear rather than relying on pattern alone. Compare surviving tiles under natural light, recording maker’s marks, edge profiles, and firing variations.
For color matching, don’t trust a wet surface or modern chart; view samples dry beside sound originals. Check pattern alignment across the entire design, including borders and repeated motifs, before cutting or ordering anything.
Retain repairable cracked tiles where they remain stable, using a conservation-grade adhesive sparingly beneath the fracture. Remove missing or unsafe pieces carefully, protecting adjacent tiles and bedding.
Set replacements on a compatible lime-based mortar, keeping original levels and joint widths. You’ll need patience: allow the bed to cure slowly, then brush joints clean without abrading historic glaze.
Lift Loose Tiles and Fix the Base
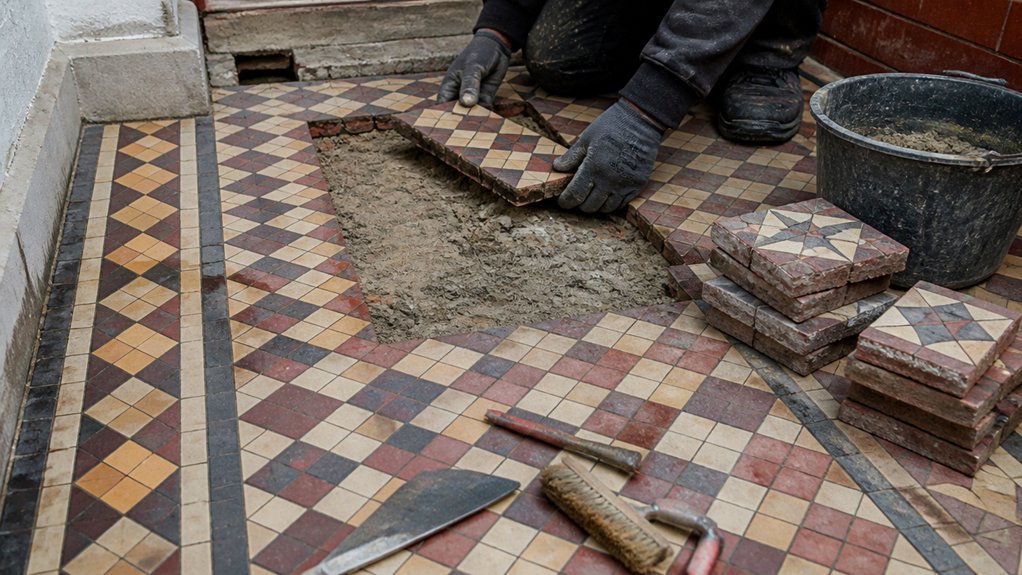
Before lifting anything, photograph and map each loose Minton tile so its original position, orientation, and pattern remain documented. Note the Tile pattern, color variations, edge wear, and bedding thickness; this record protects historical accuracy during conservation.
Slide a thin palette knife beneath a tile’s edges, working gradually rather than levering against neighboring tiles. Lift each piece onto padded paper, label it, and keep fragments with their corresponding tile.
Remove failed mortar and loose bedding from the exposed base with a wooden scraper and soft brush. Don’t use aggressive chisels or power tools, which can damage the substrate and surrounding tiles.
Examine the base for damp, cracks, hollows, or settlement. Consolidate sound areas, fill shallow voids with compatible lime-based material, and allow repairs to cure fully before proceeding.
Relay the Victorian Minton Tile Pathway
After the repaired base has cured, relay the Victorian Minton tiles according to your photographs and labels. Begin at the most visually significant edge, usually a threshold or border, and work outward so the Victorian design remains accurately aligned.
Apply a compatible, thin bedding layer, then press each tile gently into place without forcing it against neighboring pieces. Match original orientation, spacing, surface height, and color variation; don’t substitute modern tiles where sound originals can be reused.
Check the pattern frequently from standing height, since small shifts become conspicuous across a pathway. Use temporary spacers only where evidence confirms consistent joints, and clean stray bedding from tile faces immediately with a damp sponge.
Handle every piece carefully: precise placement supports historical preservation and keeps the repaired surface reversible where practical.
Regrout and Seal the Restored Path
Regrout the restored path only after the bedding has set firmly and the tiles remain level and secure. Choose a compatible lime-based or manufacturer-approved grout, matching the original joint width and tone. Avoid hard cement, which can trap moisture and damage porous Victorian fabric.
Dampen the joints lightly, then press grout into each gap with a small float or pointing tool. Keep the Minton tile faces clean; remove residue promptly with a barely damp sponge, never acids or abrasive pads.
Allow the grout to cure gradually, protecting it from frost, heat, and foot traffic. Once fully cured, assess color restoration under natural light and record the result for historical accuracy.
Apply a breathable, non-yellowing sealer only if necessary, testing first in an inconspicuous area. Maintain the path with gentle sweeping and immediate spill removal.
Conclusion
With careful assessment and a light touch, you can return a damaged Victorian Minton pathway to strength without erasing its history. Clean with restraint, repair with compatible lime-based materials, and relay each tile according to its original pattern. As you regrout and protect the finished surface, remember that every tile is a small page in the pathway’s story. Patience is your best tool: it lets the past speak clearly while ensuring the path endures for generations.

