

A Georgian façade can carry two centuries of soot, yet its original bricks and lime mortar may be only millimetres from damage. When you ask our team to clean it, you get a careful conservation process rather than a quick wash. We inspect the masonry, distinguish soot from paint, salts, and weathering, then test gentle methods in discreet areas. We protect fragile joints throughout—and the most stubborn deposits require an especially measured decision.
Key Takeaways
- We inspect and photograph Georgian brickwork, documenting soot, fragile joints, repairs, moisture, and historic features before cleaning.
- We identify soot separately from paint, salts, weathering, and deep staining through careful inspection and discreet testing.
- We begin with dry, natural-bristle brushing to remove loose soot without abrading bricks or damaging historic mortar.
- We test low-pressure, fan-shaped water sprays, using controlled settings, responsible runoff collection, and thorough rinsing.
- Persistent deposits receive conservator-approved treatments only, followed by natural drying, final inspection, and complete documentation.
Inspect Georgian Brickwork Before Cleaning

Before removing a trace of soot, inspect the Georgian brickwork closely and record its condition. Walk the elevation in consistent sections, noting brick size, bond, mortar joints, tooling, repairs, and areas of distortion. Photograph each face in even light, add scale references, and map cracks, open joints, spalling, and previous interventions. You’ll need this baseline for Historical preservation and for judging whether cleaning changes the fabric.
Carry out Material analysis where the history or composition remains uncertain, using minimally invasive sampling and suitable laboratory testing.
Check parapets, window surrounds, string courses, and concealed edges, since differing exposure can affect their vulnerability. Record moisture readings and weather conditions, then review archival evidence and earlier reports.
Only after this assessment should you define a cautious cleaning method, test location, and acceptance criteria.
Tell Soot From Paint, Salt, and Weathering
You can usually identify soot as a soft, black film that sits lightly on the brick.
Paint forms a firmer, continuous surface, while salts appear as crystalline blooms that may brush or flake away.
Check each mark gently before cleaning, because weathering can mimic all three without being removable dirt.
Soot’s Soft Black Film
Soot usually appears as a soft, matte black film that dulls the brick’s original colour without forming a hard, continuous coating. You’ll often find it gathered beneath cornices, around window recesses, and in sheltered joints where smoke settled over decades.
Its loose, powdery character may transfer lightly to a gloved finger, though you shouldn’t rub the surface to test it. Instead, inspect adjoining areas, note the deposit’s direction, and photograph the pattern before cleaning.
Soot commonly follows historic combustion routes, giving the staining historical significance and revealing past urban air conditions. Its environmental impact also matters: traffic, coal fires, and industrial emissions may have contributed to the layer.
Treat this evidence cautiously. A conservation-led assessment confirms whether gentle removal will clarify the masonry without erasing its character.
Paint’s Firm Surface
Paint usually forms a firmer, more continuous surface than soot, with a defined edge, consistent colour, and occasional brush marks or cracking. You may also find it adhering tightly around joints, reveals, or repaired areas, unlike soot’s loose, transferable film.
Before cleaning, inspect colour, texture, and boundaries under controlled light, then record photographs and observations.
Don’t assume every dark coating is modern paint: earlier limewash, distemper, or mineral coatings may carry historic value.
Compare sheltered and exposed brick, looking for fading, abrasion, and rain-related streaking that indicate weathering rather than added material.
Avoid aggressive testing, which can remove evidence needed for Historical preservation. Your aim is to identify the firm layer without disturbing it, so choose the least intervention necessary and seek specialist advice where composition or age remains uncertain.
Salt’s Crystalline Bloom
Salt deposits behave differently from both soot and paint: they often appear as pale, powdery, or needle-like crystals that gather along mortar joints, brick faces, and areas affected by damp.
Don’t mistake this bloom for light-colored paint or harmless grime. You can test gently with a dry, natural-bristle brush; soot generally lifts as a dark smear, while salts break into loose grains.
Never scrub aggressively or seal the surface before finding the moisture source. Salt crystallization can force brick faces apart as crystals grow within pores, causing salt damage, spalling, and weakened mortar.
Record the pattern, check gutters, joints, and ground levels, then allow the wall to dry gradually.
Your conservation team should remove deposits cautiously, using the least intervention necessary and avoiding pressure washing, harsh chemicals, or impermeable coatings.
Check When Professional Conservation Is Needed
When Georgian brickwork shows deep staining, open joints, friable surfaces, or uncertain earlier repairs, you should seek a conservation professional before cleaning. Their assessment can distinguish soot from salt deposits, biological growth, paint, or historic coatings, while identifying areas at risk of loss.
You’ll also need specialist advice where bricks have spalled, previous pointing is hard cement, or damp has affected the wall’s structure. A conservator can review records, construction details, and the building’s historical significance before recommending proportionate intervention.
This supports architectural preservation by retaining original bricks, joints, tooling, and weathered character rather than imposing a uniform finish. Ask for a written method statement, photographic survey, and clear explanation of proposed materials, risks, and limits.
If uncertainty remains, pause the work and obtain independent heritage advice before proceeding.
Test Gentle Methods on Hidden Brickwork

Choose a discreet, less visible area of brickwork for initial testing.
Compare gentle methods there, recording how each affects soot, mortar, colour, and texture.
You’ll then have evidence to guide the safest approach for the Georgian façade.
Choose Discreet Test Areas
Before treating the visible façade, identify a discreet area—behind a downpipe, beneath a sill, or within a sheltered recess—where you can test the gentlest cleaning method without disrupting the building’s appearance.
Choose brickwork that matches the main elevation in age, firing, mortar condition, and soot deposition. Photograph the location, record its condition, and mark its boundaries so you can monitor every change.
Protect nearby joints, timber, metalwork, and drainage components before beginning.
Work on a small, representative patch, using controlled pressure and minimal moisture.
Allow the area to dry fully, then inspect the brick face, arrises, mortar, and colour under consistent light.
If you see loss, staining, raised fibres, or softened joints, stop immediately.
This disciplined record supports Historical preservation and limits Environmental impact while protecting the wider façade.
Compare Gentle Cleaning Methods
Once the test patch is dry and documented, compare the least aggressive suitable methods in sequence: soft natural-bristle brushing, low-pressure nebulised water, and, only where necessary, a conservation-approved cleaning agent.
Record each method’s dwell time, pressure, runoff, colour change, and effect on the brick and lime mortar.
Begin with dry brushing, lifting loose soot without driving particles deeper into porous faces.
If residue remains, introduce nebulised water gradually, protecting adjacent fabric and collecting runoff before it stains lower courses.
Use an approved agent only after a conservator reviews the results, following the manufacturer’s dilution and contact-time limits.
Don’t judge success by brightness alone: retain appropriate patina and historic tool marks.
This disciplined comparison supports Historical preservation while allowing Modern cleaning techniques to serve, rather than overpower, Georgian masonry.
Protect Fragile Mortar Joints and Details
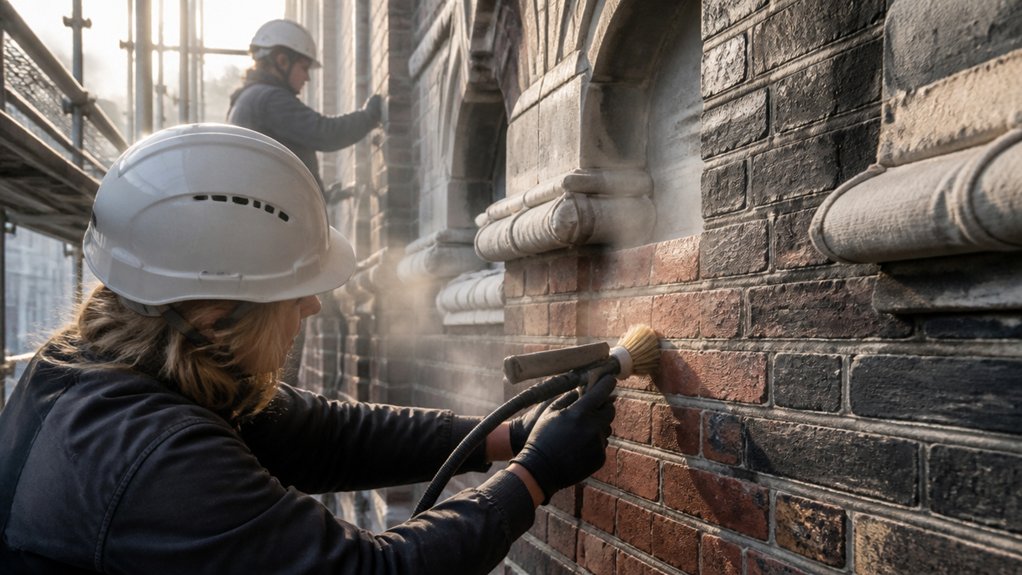
Because Georgian mortar joints can be softer and more vulnerable than the surrounding brick, you’ll need to treat them as part of the historic fabric, not as incidental gaps.
Before work begins, map joints, gauged arches, carved stone, painted details, and repaired areas, recording their condition and construction.
Use small trials to establish safe pressure, distance, and moisture levels, then shield vulnerable edges with appropriate, breathable protection.
Keep tools away from arrises and avoid raking, widening, or polishing joints.
Where mortar has already failed, pause and seek a compatible, lime-based repair rather than applying hard cement.
You’ll preserve Historical accuracy by matching existing profiles, colour, and texture only where evidence supports it.
This disciplined approach protects Architectural integrity while keeping later conservation work honest, reversible, and minimally invasive.
Remove Loose Soot From the Brickwork
First, assess the soot buildup across the Georgian brickwork, noting heavier deposits and areas near fragile joints.
Then use a soft, natural-bristle brush to remove loose debris gently, working from the top down.
Don’t disturb sound mortar or force soot deeper into the porous brick.
Assess Soot Buildup
Before any washing begins, assess how much soot is present and how firmly it adheres to the Georgian brickwork. Examine elevations in even daylight, noting colour, thickness, staining patterns, and areas where mortar or brick faces appear vulnerable. Use photographs, measured notes, and a simple condition map so you can compare results and avoid treating sound historic fabric unnecessarily.
Test a discreet location with the gentlest suitable method, observing whether the deposit lifts readily or remains bonded. Don’t assume darker areas contain more soot; shadows, dampness, old coatings, and biological growth can mislead you.
Consider the Environmental impact of each proposed treatment, including water use and runoff. This careful assessment supports Historical preservation by guiding proportionate cleaning, protecting patina, and establishing a defensible record for future conservation decisions.
Brush Away Debris
Once the assessment confirms that the deposit is loose, remove it with a soft natural-bristle brush, working from the top of the elevation downward with light, controlled strokes. Keep the brush dry, and let gravity carry loosened soot onto a clean sheet below.
Don’t scrub, press hard, or use wire bristles; these actions can abrade the Georgian brick’s face and disturb weathered mortar joints.
Brush small sections systematically, pausing to inspect the surface after each pass. Use a soft detailing brush around carved features, arrises, and recessed joints, where aggressive movement could cause loss.
Collect fallen debris rather than allowing it to re-enter drains or gardens, reducing Environmental impact.
This gentle stage supports Historical preservation by removing harmful loose deposits while retaining the building’s patina. Stop if soot remains firmly bonded, and record the condition before considering further treatment.
Clean Georgian Brickwork With Low-Pressure Water
Low-pressure water cleaning can lift soot from Georgian brickwork while preserving its historic surface, but you’ll need to control both pressure and water volume carefully. Begin only after brushing away loose debris, then test a small, inconspicuous area.
Use clean, cool water and a fan-shaped spray, keeping the nozzle well back from the face and directing water across, not into, joints. Work in manageable sections from the bottom upward to limit streaking, rinsing each area evenly.
Watch for soft mortar, open joints, salts, and trapped moisture; stop if the brick darkens unevenly or begins to shed. Collect runoff responsibly and allow thorough, natural drying.
This measured approach supports Historical preservation while applying Modern cleaning principles without sacrificing patina, tooling marks, or the building’s historic character. Keep records of settings and observations.
Escalate Carefully for Stubborn Urban Soot
If low-pressure water leaves bonded soot behind, don’t increase force indiscriminately; pause, reassess the brick and mortar, and choose the least aggressive next step.
Test a small, inconspicuous area first, recording pressure, distance, nozzle type, and dwell time.
Where appropriate, use a conservation-approved nebulous spray or a pH-neutral cleaning solution, applied sparingly and according to the manufacturer’s guidance.
Work in short, controlled passes, keeping the nozzle moving and avoiding saturated joints, friable faces, and damaged arrises.
Never rely on abrasive blasting, harsh acids, or untested household chemicals; these can strip historic surfaces while driving salts deeper into the wall.
Treat Urban pollution as a contaminant, not a reason to erase patina.
If deposits remain, stop and consult a qualified conservator, protecting the building’s fabric and supporting responsible Historical preservation before any stronger intervention.
Rinse, Dry, and Inspect the Brickwork
After cleaning, rinse the brickwork with clean, low-pressure water to remove loosened soot and any approved cleaning residue without driving moisture into open joints or porous faces. Work from the top downward, controlling flow so you don’t flood sills, cornices, or vulnerable details. Use only enough water to clear residues, reducing runoff and its environmental impact.
Then let the elevation dry naturally, with ventilation and time doing the work; don’t apply heat, sealers, or aggressive air movement. As the surface lightens, inspect it in changing daylight. Check for remaining soot, tide marks, staining, trapped moisture, flaking finishes, and newly visible cracks or biological growth.
Compare results with your pre-cleaning photographs and record observations. This measured review supports historic preservation, confirms cleaning consistency, and identifies areas needing further assessment before any next conservation decision.
Repoint and Protect Restored Georgian Brickwork
Once the brickwork has dried and the inspection is complete, address defective joints before applying any protective treatment. You should rake out loose mortar by hand, limiting vibration and avoiding damage to brick arrises. Match the original joint profile, aggregate, colour, and lime-rich composition; cement mortar can trap moisture and accelerate decay.
Test a small area first, then repoint in manageable sections, keeping new work slightly recessed where appropriate. Your choices should respect Historical authenticity rather than create a uniform, over-restored finish.
Allow the mortar to cure gradually, protecting it from frost, direct sun, and rapid drying. Finally, assess whether protection is necessary. Use a breathable, compatible treatment only after testing, and never seal sound brickwork unnecessarily.
Consider Environmental impact by selecting low-toxicity materials, minimising waste, and documenting every intervention.
Conclusion
When you clean Georgian brickwork, you’re preserving more than a façade—you’re protecting evidence of two centuries of urban life. Remember that Georgian buildings commonly date from 1714 to 1830, so every gentle decision matters. By inspecting first, testing discreetly, using low-pressure water, and respecting fragile mortar, you can remove soot without erasing character. Finish by allowing the brickwork to dry naturally, recording the results, and repairing only where necessary. This careful approach keeps historic fabric authentic for future generations.

